bulerias1981
Oud Junkie
    
Posts: 770
Registered: 4-26-2009
Location: Beacon, NY
Member Is Offline
Mood: John Vergara Luthier Lord of the Strings instrument making and repair
|
|
Metal parts in oud (screws, nails) and the workings of a screw
Hi all. I wanted to discuss the usage of metal in an oud. Mainly the neck joint. In the olden days of the lute, a nail was used in the neck block into
the neck. Also, Ibrahim Sukkar, Fadi Matta, and a couple others use metal in this area either to pull the two surfaces together tightly, or so that an
adjustment can be made at a further date.
What do you think about this personally? Some have different opinions about this. For me I don't mind metal there, or even to install a screw to
repair a broken pegbox. I have done a few repairs like this with no negative impact on the sound at all.
For the neck block/neck joint, Dr. Oud suggests to use a flat end screw with a washer if you were to use a screw. Also that most necks are made of
pine or spruce. I think if the screw method is done correctly, it can be very effective. I've used the dovetail joint on oud#1 and oud#2. Obviously
its a solid joint, but one that is very difficult to repair. The traditional dowel method I like and don't like. It obviously won't provide a lot of
support, but its easy to repair. I feel the screw provides a rock solid joint, and to rework, remove the rosette if there is one, and simply loose the
screw, and cut the neck joint with a thin saw as usual.
One con I can think of is that over time the screw could come loose a little. What other cons may I be missing here?
|
|
|
bulerias1981
Oud Junkie
    
Posts: 770
Registered: 4-26-2009
Location: Beacon, NY
Member Is Offline
Mood: John Vergara Luthier Lord of the Strings instrument making and repair
|
|
Since I was on the topic, I'd like to share with you the workings of a wood screw. I have met some people to my suprise that don't understand how a
screw works or how to properly install a screw. If you drill a pilot hole for both pieces, and jam the screw in, what you have now is just a pin. It's
not really pulling the two pieces together, and you have a weak joint.
There are a few styles of wood screws. Mainly fillister, oval head, lag screw to name a few.
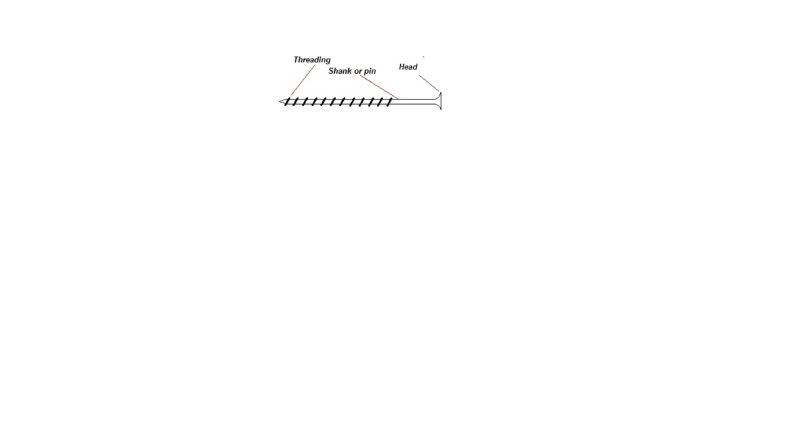
This is a diagram of a fillister style wood screw. (Sorry, its really small!!) You have the inner part of the screw, called the shank or the pin. The
outer part is the threading. This is what helps pull the piece in one direction. And the head, which pulls the second piece toward the first piece.
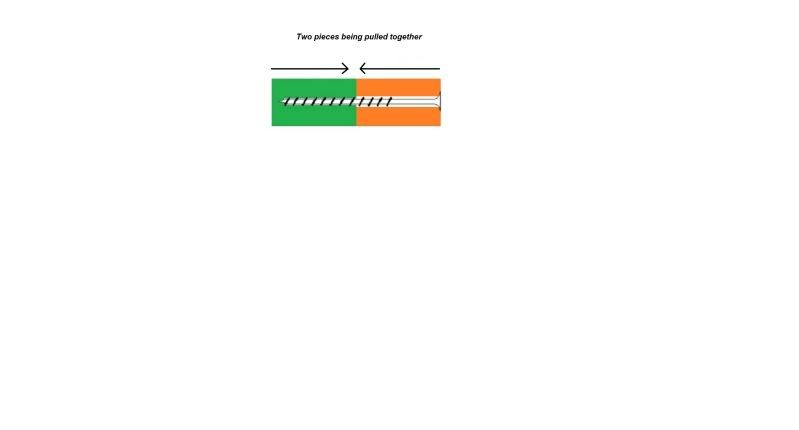
This is the diagram of two pieces being pulled together. Maybe its hard to see, but the hole on the green piece is just slightly wider diameter
compared to the shank diameter. The threading is meant to groove into this piece. And the orange piece hole diameter is slightly wider than the
threading diameter... just enough so that the threading doesnt even touch the orange piece at all!. Note that the head of the screw is holding a lot
of the torque along with the threading. You must countersink this side for a fillister screw to work properly.
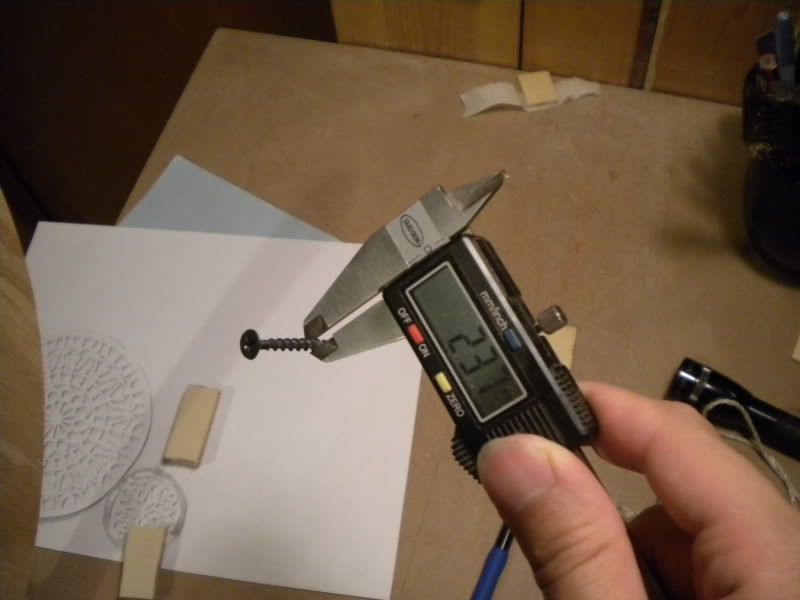
Measuring the shank. I got 2.4mm roughly.
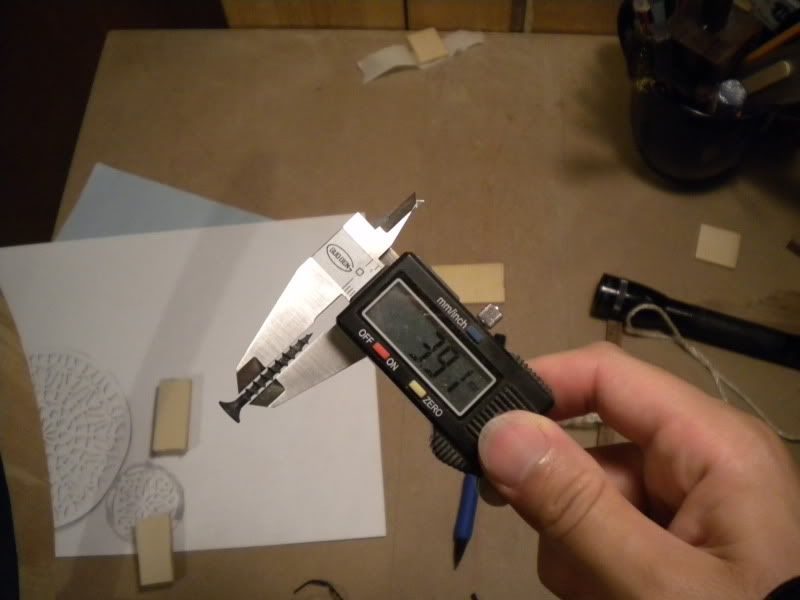
Measuring the outer threading. This measurment is more accurate since its easier to obtain with the calipers. 3.9mm
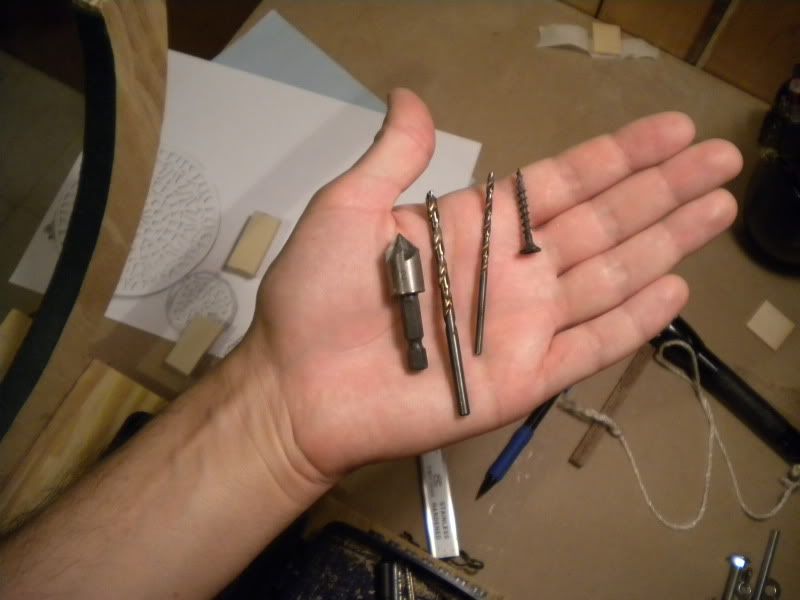
Everything you'll need to do the job correctly. (from left to right) Countersink bit since this example is a fillister screw, larger drill bit
(4.2mm), smaller drill bit (2.7mm), and the screw of course!
|
|
|
SamirCanada
Moderator
     
Posts: 3405
Registered: 6-4-2004
Member Is Offline
|
|
Thanks for sharing your ideas. I always tended to dislike metal parts in the oud but I do see the advantage of using screws and bolts to mechanicly
renforce the neck joint.
To me, the main disavantage of a dovetail or even a tenon joint is the difficulty to get the action right and once the glue has set in there... Good
luck 
It also needs to be flawless to work properly.
I like that with a mechanical system, you could tweak the angle untill you get it right then tighten everything down and there you go.
If anything, there is an Opportunity here in the forum to colaborate and research and develop a new mechanical system to attach a neck block.
I will try to draw some sketches. If we all submit something, I am sure we can come up with an interesting design.
Hopefully Faruk, John Downing, Jameel and others join in 
Common you guys 
@samiroud Instagram
samiroudmaker@gmail.com
|
|
|
SamirCanada
Moderator
     
Posts: 3405
Registered: 6-4-2004
Member Is Offline
|
|
Just another idea, would it be a worthwile endeavour to explore the use of mandolin truss rods for a oud?
@samiroud Instagram
samiroudmaker@gmail.com
|
|
|
bulerias1981
Oud Junkie
    
Posts: 770
Registered: 4-26-2009
Location: Beacon, NY
Member Is Offline
Mood: John Vergara Luthier Lord of the Strings instrument making and repair
|
|
I can see a truss rod system being done, where it runs through the neck, and you can adjust it with an allen key via the pegbox side.
|
|
|
bulerias1981
Oud Junkie
    
Posts: 770
Registered: 4-26-2009
Location: Beacon, NY
Member Is Offline
Mood: John Vergara Luthier Lord of the Strings instrument making and repair
|
|
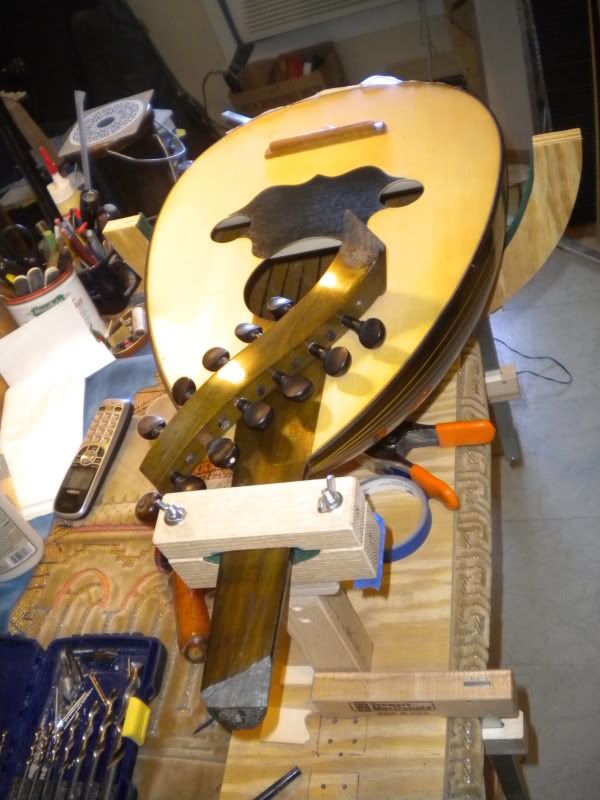
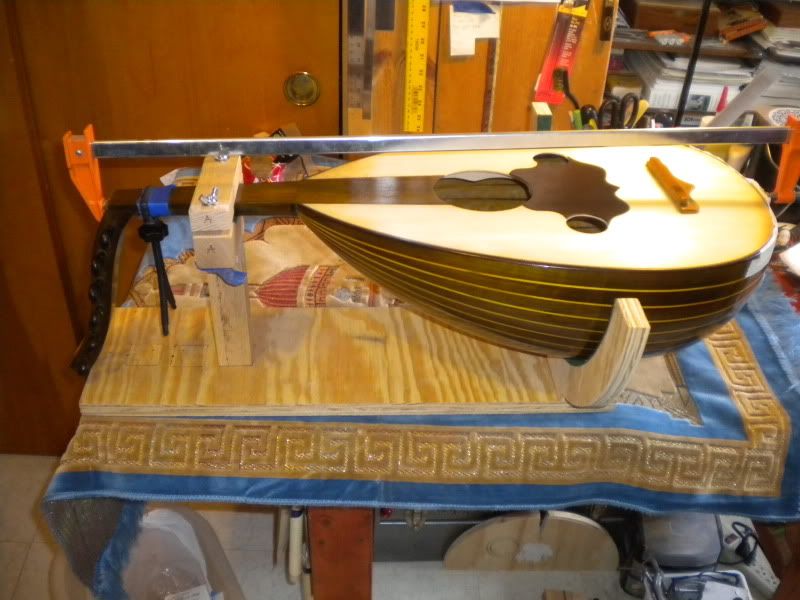
Heres a repair I did on my friend's Sukkar. His kid knocked it off the couch and broke the neck entirely. I drilled a hole in the pegbox into the
neck, and used the same method for applying a screw. Installed the screw, glued the broken parts with Titebond 3 (very few times I'll use synthetic
glue), and lastly clamped the pegbox with a large clamp terminating at the back of the bowl. I also used a fingerboard clamp around the break to apply
pleassure in all directions.
So here is a case where there is a metal pieces in the oud.. happens to be one of the best sounding Sukkar ouds I've ever heard, even better than most
expensive ouds! There are all kinds of metal in this oud! Metal from the original Sukkar neck adjusting system, plus the single screw I added. No
change to the tone. And only a freak could feel a difference of a single nail in weight.
|
|
|
jack
Oud Junkie
    
Posts: 116
Registered: 4-5-2010
Member Is Offline
|
|
Well then, here's a field repair with metal screw and broken neck as well.
I bought a very cheap oud on an ebay auction to take with me on my last trip to Europe, since I was planning to camp, and didn't want to leave a nice
oud in the campground while I was out and about for fear of theft. At the end of the 2nd week of the trip I noticed that the action on the oud was
getting very high, and I thought maybe it was the humidity and heat causing this, but, no, the neck was cracking on both sides, and the head was
lifting up due to the tension of the strings. The cracks were growing quickly, and I had to find a way to fix the oud without delay, or I'd be without
it for the last week of my trip. I was in a cheap hotel room at the time, so I extracted a screw from the wall, and screwed it into the base of the
neck, near the body. Then I took the lightest wound string from my spare set of strings that I always carry, and tied one end of it to the screw, and
the other to the head of the oud, and, using some leverage techniques, torqued the head back down, and the crack disappeared, and the whole thing
stabilized. I was able to play the oud without any further problems for the remainder of my trip (see the image). I returned the screw to the hotel
wall before leaving, and flew back to Canada, where I did a quick repair on the oud using another metal screw, driving it into the top of the neck,
through the lower part of the head, and briefly into the neck that lies just beneath the fingerboard. Not something that anyone would want to do with
a decent oud, but for one that cost me $70, it's fine again and ready for another adventure.

|
|
|
Microber
Oud Junkie
    
Posts: 853
Registered: 1-20-2006
Location: Belgium - Liège
Member Is Offline
Mood: No Mood
|
|
For Jack,
Interesting sympathetic extra string ! 
Robert
|
|
|
Dr. Oud
Oud Junkie
    
Posts: 1370
Registered: 12-18-2002
Location: Sacramento, CA, USA
Member Is Offline
Mood: better than before
|
|
bulerias makes a good case for the use of screw attachments, and his preparation method is sound. I have a few things to add:
You should use a large diameter screw, like #12. The small diameter of the drive screw pictured makes the possibility of stripping the threads in the
wood more likely. A larger screw simply has more wood under the screw thread.
Most ouds use soft woods for both the neck and the neck block. This makes the threads more likely to strip out and also compresses the area under the
screw head, resulting in a loose neck. Even if the screw is tight when installed, it can loosen due to compression of the wood over time. I would not
recommend using a flat head screw for this reason. A pan head screw with a large flat washer will help avoid compression of the neck block surface.
The best method is to use a threaded insert. These use a much larger wood thread on the outside, and a machine screw thread for the attachment screw
or bolt, with a flat washer.

Bolted necks are used on guitars, but they have a much larger area including the heel of the neck, so they can use two screws. The oud neck is too
small for two screws of adequate size.
|
|
|
Brian Prunka
Oud Junkie
    
Posts: 2939
Registered: 1-30-2004
Location: Brooklyn, NY
Member Is Offline
Mood: Stringish
|
|
Quote: Originally posted by Dr. Oud  |
Bolted necks are used on guitars, but they have a much larger area including the heel of the neck, so they can use two screws. The oud neck is too
small for two screws of adequate size. |
Most bolt-on necks use 3-4 screws and a large reinforcing plate, and both necks and bodies tend to be hardwoods.
Though I prefer the tenon joint set necks generally . . .
|
|
|
Dr. Oud
Oud Junkie
    
Posts: 1370
Registered: 12-18-2002
Location: Sacramento, CA, USA
Member Is Offline
Mood: better than before
|
|
solid body electric guitars use a metal plate and 3 - 4 screws, bolted parallel to the neck to into a pocket at the top of the body. Electric necks
and bodies are made with mid-hard woods, like maple, ash and mahogany.
Modern steel string guitars are bolted in a variety of ways, including adjustable pivoting mechanisms. The necks are almost always mahogany as well as
the neck blocks.
The tenon joint is strong and secure but difficult to repair when the neck needs to be re-set. I have not seen the tenon joint used on old ouds, only
modern ones (after 1970 or so) so I'm sticking with with the butt joint aligned with a dowel. Simple, and effective, it suits me fine.
|
|
|
fernandraynaud
Oud Junkie
    
Posts: 1865
Registered: 7-25-2009
Location: San Francisco, California
Member Is Offline
Mood: m'Oudy
|
|
Isn't a truss rod strictly to compensate for bowing in a mandolin neck? The short oud neck doesn't tend to bow. Is the concept to use a truss rod the
somehow adjust the joint angle?
For those of us who like an adjustable neck-body joint, the Sukar design is minimal. It lacks the necessary range to cover all cases of settling over
the years. To extend the adjustment range requires taking it apart to sand/file the mating surfaces.


Although many people can do it without having extensive skills or tools, this is a nuisance. I suppose if it left the bench capable of a wider
adjustment range, the design could be considered adequate, but can anyone accurately diagram the Fadi Matta design so we can draw inspiration from it
as well?
|
|
|
jdowning
Oud Junkie
    
Posts: 3485
Registered: 8-2-2006
Location: Ontario, Canada
Member Is Offline
Mood: No Mood
|
|
Although this thread is concerned with the practical concept of an oud design with a 'knock' down' or otherwise adjustable neck, this is a modern
concept not a traditional one where necks were not intended to be taken apart - at least not easily.
Unfortunately the only 'old' ouds that survive - with only one or two possible exceptions - date from the late 19th C/ early 20th C. so it is
difficult to know what the earlier usual practice was of attaching an oud neck to the bowl. A neck joint - glued with hot hide glue - is potentially
weak due to the end grain of the neck wood and brittle nature of the glue itself so that a sharp knock might easily separate the joint. So a simple
butt joint alone will not serve without some form of additional reinforcement. Lutes of the 16th and 17th C (and violins up to the 19th C) had the
necks glued and nailed to the neck block. The attached images show the type of the single hand forged, square cut, nail that was used on lutes (the
images are ones that I made to demonstrate how it was done). The nail aligns the neck to the neck block and allows a clamping force to be immediately
applied - necessary when working with fast setting hide glue. The nail then provides the necessary additional reinforcement to the joint. Clearly a
joint made this way is not intended to be taken apart so sufficient material is provided in the neck/fingerboard to allow any adjustment to string
action - if required - to be achieved by planing the neck with the neck still in place.
An old method used on some ouds was to use a dovetail mortice and tenon joint. The attached image shows the arrangement on an old oud that I purchased
in Cairo in 1963 - no date on the label but probably made in the late 19th/ early 20th C. It can be seen that adjustments have been made to the
dovetail to reset the neck alignment (by adding thin wooden shims) and also demonstrates a potential weakness with this type of joint - the wedging
action of the dovetail has caused the neck block to split.
This type of joint is difficult and time consuming to make by hand with precision so some modern makers prefer to use a simpler (but effective) spline
joint or a dowel.
Is there any evidence in the surviving old ouds to confirm that nails were used to fix the necks as they were on lutes? After all it is the simplest
and most straightforward solution and - as lutes were supposed to have been developed from the oud - one might expect that nails were used on ouds at
one time as well?
I am currently preparing an article (for the lute making fraternity) on the use of nailed joints and how to make the nails - for the benefit of anyone
that would like to try the technique. I shall post details later on this forum - as a separate topic - for information.


|
|
|
Dr. Oud
Oud Junkie
    
Posts: 1370
Registered: 12-18-2002
Location: Sacramento, CA, USA
Member Is Offline
Mood: better than before
|
|
I need to address some issues raised by our esteemed historian jdowning.
End grain glue joints must be primed with a 2 step glue process. Glue is appied to the end grain and left to cure, then the surface is cleaned to
expose the wood. This will seal the end grain and prevent a dry joint.
Hide glue does not need to be clamped. The joint must be fitted precisely with no gaps. The parts can be held together until the glue gels, then left
undisturbed for a day or two to cure completely. Clamping is required for synthetic glues, but not hide.
I doubt that any reinforcement will prevent loosening the neck joint when it gets a "sharp knock". I believe the integrity of the butt joint is the
primary strength element in the joint, and the dowel, tenon or nail will not prevent misalignment if the butt joint fails. The additional strength of
secondary features (dowel/tenon/dovetail, nail, or screw) can be beneficial, but if the primary butt joint is not sound, the neck will loosen anyway,
no matte what the reinforcement is.
I fail to understand the reinforcement characteristic of the nail. It is small in diameter, and very different material. This difference affects it's
expansion/contraction as well as it's adhesion characteristics, so how can it reinforce the joint? I think it was just used to align the neck while
the glue cured. The nail can't make the joint permanent, just not possible to repair with another nail.
As for making a permanent joint with enough material on the fingerboard to plane for adjustments - it just doesn't work. The oud is a very flexible
instrument, and over time the body will bend under the string tension - all stringed instruments do. Providing enough material at the fingerboard for
future adjustments is just not practical.
I may be wrong, but I may be right.
|
|
|
jdowning
Oud Junkie
    
Posts: 3485
Registered: 8-2-2006
Location: Ontario, Canada
Member Is Offline
Mood: No Mood
|
|
All of my lutes have neck joints that are permanently glued and screwed and so have remained relatively stable over 40 years. Any slight adjustments
made have been accomplished by planing back the finger board or replacing the finger board and planing back the neck. So - providing the neck joint is
correctly glued and reinforced - it is perfectly practical to provide extra material on the neck/fingerboard thickness for future adjustment without
having to reset a neck.
For maximum strength, all glue joints - including those made with hot hide glue - must not only have end grain properly sealed and be accurately
fitted but must clamped properly so that the joint faces are in intimate contact and the glue line thickness minimal. This cannot be achieved - in the
case of a hide glue joint - by just holding the parts together with finger pressure until the glue gels - the joint must be firmly clamped while the
glue is allowed to fully dry by evaporation.
Furthermore, if a neck joint is not also reinforced, after time and humidity cycling, the glue will weaken and the joint start to 'yawn' (under the
bending moment due to string tension) starting at the bottom of the joint which is the highest stress point. Hide glue significantly weakens at
Relative Humidity values over 80% and expands. It will reharden again when the RH drops to lower values but the glue will not shrink back to its
original dimension It only takes a small separation of the joint to produce a magnified larger movement of the nut as demonstrated in the attached
diagram.
The European luthiers of the 16th to 18th C solved this problem by using a nail or nails driven through the neck block into the neck. The nails used
by the lute makers were forged square in section with large diameter heads and were about three times the thickness of the neck block in length. This
type of nail - or more properly 'spike' - unlike the thin wire nails generally available these days can be driven into wood without splitting it and
grip so firmly once driven into place that they are very difficult to remove - especially when surface corrosion sets in.
The purpose of the nail is to hold the neck in proper alignment and provide sufficient clamping force on the joint before the glue starts to gel -
speed is of the essence here. The nail then securely holds the joint together and so reinforces the joint against separation should the glue become
temporarily weakened in humid conditions.
As an example, the attached sketch is drawn full size from an X-ray image of a late 16th C lute by renowned lute maker Michielle Harton made in 1598.
So over 400 years later the lute with its neck joint and reinforcing nail survive intact. The dimension of the nail scaled from the x-ray image is
about 6 mm square by 90 mm long with a head 15 mm diameter. The additional joint strength provided by the nail seems obvious.
Another example (but there are many more) shows a lute by 16th German maker Hans Frei - that was fitted with a wider neck during the 17th C - with
three nails driven into the neck.
My question to those who have had the opportunity to open up and examine some of the older surviving ouds - all in the interests of historical fact
and knowledge - is there any evidence of nails being used to retain the neck of an oud as once was common practice for lutes?


|
|
|
fernandraynaud
Oud Junkie
    
Posts: 1865
Registered: 7-25-2009
Location: San Francisco, California
Member Is Offline
Mood: m'Oudy
|
|
No question in my mind that the iron nail was a practical solution. But I would hazard a guess that not a single case of metal reinforcement will be
found among old ouds. Lutemakers seem to have had longer life in mind for their instruments than oudmakers. There's a bit of a "disposable" approach
to how ouds have been made.
But in this day of "bargain" 1600+ euro ouds, exotic woods, painstaking finishing and the rising cost of repairs, that simply won't do. Planing
fingerboards requires the right tools and skills. It's clearly not as practical as turning a butterfly nut, and it's too easy to ruin a fingerboard.
Cutting and resetting a neck with a saw in the 21st century is beyond absurdity. It's like trimming aircraft ailerons with a hammer. Let's also grant
that we live and travel in different climates much more than in previous centuries.
So I argue for widely adopting the adjustable neck. Given the flexible metals we have nowadays, unlike iron spikes, the Sukar design is a very clever
simple solution to an age-old problem, one that could be improved upon, and widely used. It's not like machine tuners or even like the (accepted!)
floating bridge. It doesn't change the character or sound of the instrument. I only hope any adopters will always used non-corroding metals and
provide a degree or so of additional angle between the mating surfaces, so the strings can be lowered to contact the fingerboard on the day the oud
leaves the bench, to allow "dialing in" any action desired even after long term settling.
I suspect that in spite of a more sophisticated appearance, the Fadi Matta design is not all that different:
http://www.youtube.com/watch?v=s09aZgHejE8
Fadi Matta covers the gap area with an elegant brass piece, while Sukar uses a wooden strip. The position of Matta's two adjustment wheels suggests
that the "lock" nut and the "adjust" nut are on one threaded rod in much the same position as Sukar's. Is there a threaded insert in the neck block,
or just an immobile nut? Are steel rods used to allow flexing, or is another mechanism used? Does anyone know?
|
|
|
bulerias1981
Oud Junkie
    
Posts: 770
Registered: 4-26-2009
Location: Beacon, NY
Member Is Offline
Mood: John Vergara Luthier Lord of the Strings instrument making and repair
|
|
When I studied violin making, my late German master taught me hyde glue on end grain needs to be applied slightly more liberally due to the fact that
the glue is easily absorbed into the end grain, thus providing less glue and a weaker joint.
However, its also important for me to add, that I learned from him the "squeeze out" of glue is necessary in order to obtain a good joint. Hyde glue
in a short time begins to gel, and in that state you're certain to get a bad joint. So for this, clamping is necessary in order for the glue to
squeeze out, so that the two surfaces mate perfectly, the glue will evaporate, and then do its job.
I had a Fadi Matta oud, and didn't care so much for his adjustable system. I guess I have a slight problem with protruding nuts coming out of the
neck. The oud has a nice modern sound to it. I don't feel the metal effected the tone in a negative way. However, certainly a floating bridge oud has
a much different tonal character than a fixed brdige style. There are no positive or negatives on that, only a matter of preference.
As a reminder to all engaged in this discussion, I started this thread to see what are people's opinion on the tonal effect of metal parts associated
with the oud (in small amounts of course). My argument is that there is no noticable effect on the tone from screws, or bolts to either align or
adjust the neck.
|
|
|
Dr. Oud
Oud Junkie
    
Posts: 1370
Registered: 12-18-2002
Location: Sacramento, CA, USA
Member Is Offline
Mood: better than before
|
|
The truss rod is used to adjust the "relief" for the fretted neck, not to correct for high action. The relief is a sligh curve in the neck that
provides imporved playability and intonation.
The oud neck is very short relative to the string length, and under a lot less tension than a steel stringed instrument. The high action on an oud is
a result of warp in the body (if the neck joint is still sound and was correct in the first place). The oud body is very weak compared with most other
stringed instruments, and over time will bend up from the string tension, causing the high action
|
|
|
freya
Oud Junkie
    
Posts: 276
Registered: 2-8-2004
Location: Asheville NC
Member Is Offline
Mood: Happy in the mountains of WNC
|
|
Just to provide a reference for those not familiar, LMII has these:
http://www.lmii.com/CartTwo/thirdproducts.asp?CategoryName=Truss+Ro...
Separately, the Belleville conical washers are a nice replacement for the flat washers that Sukar uses.

|
|
|