| Pages:
1
2 |
SamirCanada
Moderator
     
Posts: 3405
Registered: 6-4-2004
Member Is Offline
|
|
Indian Rosewood oud (completed!)
Hi everyone,
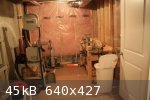
as is customary, I am starting a new oud project, in a new house, in a new workshop... I hope this is the last time I move for the next 5 years at
least  what a pain in the... it is to set everything up again. what a pain in the... it is to set everything up again.
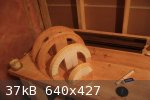
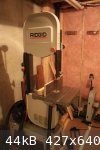
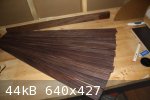
anyways, here are some pics of my new shop and project I am working on.
@samiroud Instagram
samiroudmaker@gmail.com
|
|
|
sabbassi
Oud Junkie
    
Posts: 570
Registered: 4-28-2008
Location: Morocoo
Member Is Offline
Mood: happy
|
|
He Samir,
Wow, nice big workshop. I envy you 
I like to have one of these big bandsaws (no space).
Hope many wonders will come out from your new place.
Enjoy it
Best regards, Samir
|
|
|
bulerias1981
Oud Junkie
    
Posts: 771
Registered: 4-26-2009
Location: Beacon, NY
Member Is Offline
Mood: John Vergara Luthier Lord of the Strings instrument making and repair
|
|
Hey Samir. Enjoy your new home and workspace, I see you have a nice new bandsaw with a rip fence. This should make resawing the ribs easier. Good luck
on your new project.
|
|
|
SamirCanada
Moderator
     
Posts: 3405
Registered: 6-4-2004
Member Is Offline
|
|
Thanks guys,
I made the resaw fence myself... with some scrap melamine boards leftover from my new kitchen cabinets  it ended up working pretty well. it ended up working pretty well.
I used a silicone steel blade by R&D Bandsaw http://www.tufftooth.com/ It did cut very smooth and straight and I ended up with 19, 3mm ribs. After planing, my ribs are 2.5-2.3 mm. Although
the blade was brand new, after cutting the wood for this oud its been dulled out considerably. Still dough, the cuts ended up being straight and
smooth throughout... it just got louder and harder to push when I got towards the last couple of ribs.
The bandsaw is a horrible dust monster and the dust collection port is very poorly designed. In the end, I had to wear a mask to avoid breathing in
the rosewood dust and it took me an hour to vacum the workshop of all the purple dust everywhere.
I also added a antivibration link belt and it made the whole difference in the world. It was as if that bandsaw had legs before and it would want to
take walks around the workshop  with the link belt its much better behaved. with the link belt its much better behaved.
I would like to include maple purfling strips in between the ribs of the oud. Anyone want to describe the proceedure to me? pictures would be nice too

@samiroud Instagram
samiroudmaker@gmail.com
|
|
|
Yaron Naor
Oud Junkie
    
Posts: 275
Registered: 1-24-2009
Location: Bat Hefer, Israel
Member Is Offline
Mood: Happy
|
|
Hi Samir,
Very nice shop! enjoy it... looking foreword for the next projects to come
Please update us with nice photos...
Regards
Yaron Naor
|
|
|
sabbassi
Oud Junkie
    
Posts: 570
Registered: 4-28-2008
Location: Morocoo
Member Is Offline
Mood: happy
|
|
Hi Samir,
I have never used a bandsaw for cutting the ribs. I use a table saw the ribs (bosch). I have mounted a saw brand called CTM orange tools thin kurf
kirbide 1.7mm thick. and I have it now for 8 months, I have use it for almost anything neck, ribs, fingerboards (ebony, macassar and other hardwood).
the ribs comeout very smooth and do not even need planning most of time.
For the purfling strips I use a small table saw from proxxon with a 1mm small thin blade, but have enouph power to cut even trough hard wood.
http://www.youtube.com/watch?v=lDanOgTt41g
I have used a small bandsaw for the ribs but he cut is bubbly and because the saw will zigzag a bit anyway (two hands are just no enouph).
but you maybe find a better way to do it with the bandsaw
The advantage of this little table saw is that the hight of he blade can be adjusted to the hight of the strips resulting a clean cut. I usualy cut
1mm or 1,1 max so the look of the strips on the oud are not to harsh (big).
and here is a picture how I do it. first bend the ribs, plane one side straight with you new lV tool  and cut out the strips using the table saw: and cut out the strips using the table saw:
hope you find it useful


Best regards, Samir
|
|
|
jdowning
Oud Junkie
    
Posts: 3485
Registered: 8-2-2006
Location: Ontario, Canada
Member Is Offline
Mood: No Mood
|
|
Hi Samir
A bandsaw (or any wood working equipment) without a dust extraction system is a potential health problem - particularly if your workshop is not
separated from your house and if you are cutting any wood but particularly exotic hardwoods like rosewood that can cause respiratory problems or skin
irritation. The dust can also cause problems with your motor drive causing overheating and preventing starting. Been there - done that!
A dust extraction system can be home built and so quite inexpensive - made from plastic pipe from local hardware stores powered by a 'ShopVac' type
vacuum cleaner. Ideally it should be vented to outside the building and - very important - 'grounded' with a bare copper wire run through the length
of the vent piping (connected to the ground terminal of your electrical supply). This is to prevent a static electrical charge building up due to the
dust being drawn through the piping. This is a potential fire risk.
If you would like to see my 'home built' band saw extraction system drop by anytime you happen to next be en route between Ottawa and Montreal.
You should be able to get a better performance from your band saw blade than just one set of rosewood ribs - and without 'forcing' the cut. What
number of 'teeth per inch' are you using? For re-sawing veneer I use a 3/8 inch X 3 tpi 'Viking' blade from Lee Valley Tools - good quality, well
hardened and set - and so long lasting.
For cutting inter-rib 'lines' I use the band saw to cut the strips that are then precisely thicknessed with a simple jig and hand plane. The strips
are then hot bent to the curvature of the ribs. See "Old Project - New Lute" page 4 -5 (p 12 Oud Projects Forum).
|
|
|
bulerias1981
Oud Junkie
    
Posts: 771
Registered: 4-26-2009
Location: Beacon, NY
Member Is Offline
Mood: John Vergara Luthier Lord of the Strings instrument making and repair
|
|
Wow Sabbassi, I'm loving that PROXXON Table saw!!! I'm going to have to invest in one. What would you say that cons are on that machine? Any problems
you noticed? And how much do they sell for?
For purfling strips between the ribs, I ordered from stew mac. I shape the rib at the center, glue it to the mold. I then shape the next ribs, make
sure they fit to the set ribs, do my fine tuning as needed. I rub a little glue on the edge of the rib with a small stick or brush at small increments
at a time, then wrap a nylon string around the purfling strip and rib to clamp it to the edge. I keep doing this until its dry. Then after it dries, I
unwrap the twine, and remove extra glue with a plane, file, or chisel.
I'm not home right now, but when I get home I can post pictures of the process.
|
|
|
sabbassi
Oud Junkie
    
Posts: 570
Registered: 4-28-2008
Location: Morocoo
Member Is Offline
Mood: happy
|
|
Hi Bulerias,
The machine is very wel built and does not make noise at all. one important thing: it looks smal but it is still a dangerous babe. I have had a 2,5
cm deep cut in my left middle finger the second day I had it. almost lost a finger  .
.
the price is about 320 euro. the little sister is smaller one, less dangerous and excellent for veneer and light wood work(Ks 23)
You can make you own exotic strips yourself, with any kind of wood. buying ready strips is nice but making your own is even better.
I think I have posted some pictures how to place the strips between the ribs the easy way. it is almost as you said, I use Titebond (he green bottle,
take longer time to set up (about 10min) than the normal yellow titebond bottle, plentyof time to rub both sides of the ribs with glue and place the
strip between them and go up slowly and at the same time joining the ribs with tape.
Te tape has an amazing power bypulling the ribs to each other, you even see the glue being squeezed out of the ribs.
would love to see your pictures.
Best regards, Samir
|
|
|
SamirCanada
Moderator
     
Posts: 3405
Registered: 6-4-2004
Member Is Offline
|
|
ouch.... I can just imagine the kind of cut you could get with that type of table saw. Be carefull man!
The technique you describe here is the kind of technique I use to make the straight edge binding but I never thought about doing the strips like that.
only problem is with a bandsaw you are right that the strings would not be straight enought and would require a lot of planing or even sanding on a
flat board which would be easier given the size of the strips.
I am thinking of using maple veneer and cut the strips from a large veneer peice in the outline of the rib with an exacto knive. no bending required
that way 
@samiroud Instagram
samiroudmaker@gmail.com
|
|
|
SamirCanada
Moderator
     
Posts: 3405
Registered: 6-4-2004
Member Is Offline
|
|
rib storing thing
Thought I would share with you this little thingamajig I made to hold the bent ribs. I saw it somewhere I think on a lute making blog.
anyways it works great and it is very conveniant.
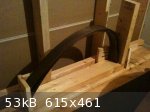
@samiroud Instagram
samiroudmaker@gmail.com
|
|
|
bulerias1981
Oud Junkie
    
Posts: 771
Registered: 4-26-2009
Location: Beacon, NY
Member Is Offline
Mood: John Vergara Luthier Lord of the Strings instrument making and repair
|
|
Is this the machine you have, Sabbasi?
http://www.satberlin.de/de/Proxxon-Maschinen/Tischgeraete-/Proxxon-...
|
|
|
jdowning
Oud Junkie
    
Posts: 3485
Registered: 8-2-2006
Location: Ontario, Canada
Member Is Offline
Mood: No Mood
|
|
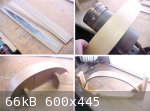
On a "lute making blog"? Look no further than "Old Oud - New Project", page 5 on this forum!
|
|
|
SamirCanada
Moderator
     
Posts: 3405
Registered: 6-4-2004
Member Is Offline
|
|
Ha!
There it is. Thanks John.
@samiroud Instagram
samiroudmaker@gmail.com
|
|
|
SamirCanada
Moderator
     
Posts: 3405
Registered: 6-4-2004
Member Is Offline
|
|
Some updates.
since I am back from vacation and I finally have some time to work in the shop.
Here is my progress so far.
Thanks to all my friends from the mikeouds.com family for you continued support and encouragement. A special thanks to all the other contributing
professional and aspiring luthiers who also share their work here. You are all an inspiration to me. Wow... I feel so warm and fuzzy on the inside
:P
http://samirnassifoudluthiery.blogspot.com/2011/10/building-bowl.ht...
@samiroud Instagram
samiroudmaker@gmail.com
|
|
|
sabbassi
Oud Junkie
    
Posts: 570
Registered: 4-28-2008
Location: Morocoo
Member Is Offline
Mood: happy
|
|
Hi Samir,
Nice and clean work. also very organized shop. when do you think you will finish the bowl?
Best regards, Samir
|
|
|
SamirCanada
Moderator
     
Posts: 3405
Registered: 6-4-2004
Member Is Offline
|
|
At this rate... Proably going to take me a couple of weeks. 
Thanks ya Samir.
@samiroud Instagram
samiroudmaker@gmail.com
|
|
|
Ari
Oud Admirer

Posts: 1
Registered: 11-23-2011
Member Is Offline
|
|
Really done nice job there man!!
Thanks for sharing this.
Ari
|
|
|
SamirCanada
Moderator
     
Posts: 3405
Registered: 6-4-2004
Member Is Offline
|
|
woah... that was too long a break.
Finally completed the bowl this week. I took about a year off from working on this project. I had to put in hardwood floors in my house and other
lovely projects that comes with a new house.
Here are the pictures. still need to scrape it clean.
@samiroud Instagram
samiroudmaker@gmail.com
|
|
|
FastForward
Oud Junkie
    
Posts: 225
Registered: 6-2-2008
Member Is Offline
Mood: No Mood
|
|
Samir,
Its good to see you back to oud making. The Bowl looks beautiful already. Hope to see more.
Ibrahim.
|
|
|
SamirCanada
Moderator
     
Posts: 3405
Registered: 6-4-2004
Member Is Offline
|
|
update
Hi everyone,
the back is now scraped clean. I really love the figure on this rosewood. its gonna be gorgeous. I tried to do some patterns by alternating the grain
on the ribs. I love the looks but I lost track of the rib order when I took such a long break in building it.
Next oud I will pay more attention to that.
I also found a new trick to hold the very thin piece that goes at the back of the pegbox while planning. TAPE 
works like a charm and is more predictable than using a shooting board block.
I posted a video in an another post on bandsaw sharpening. This is the revelation of the year for me. My saw cuts better than brand new and I was just
about to toss out the blade!
I had the blade off because the tension adjustment portion of my saw had jammed completely. the nut at the bottom of the spring had stripped the
adjustment screw so I had to order a new one. I ordered one with a handle crank. what a difference!! so easy to add and remove tension.
Made some more progress following that, I shaped the neck block to rough dimensions and glued the pegbox assembly. I really need to make a precise jig
to do that. Its always guessing work for me.
@samiroud Instagram
samiroudmaker@gmail.com
|
|
|
dkhoury35
Oud Junkie
    
Posts: 181
Registered: 11-3-2010
Location: Melbourne Australia
Member Is Offline
Mood: IM IN THE M-OUD
|
|
looks fantastic great work
|
|
|
SamirCanada
Moderator
     
Posts: 3405
Registered: 6-4-2004
Member Is Offline
|
|
Hello my peeps,
I know many of you enjoy following the construction of instruments so I am posting some updates of my oud. I did some considerable progress over the
last few days.
I have sold all my previous instrument so I am hoping to make this one for my self. Actually I am making it for my new born daughter who will
hopefully learn to play if I have anything to say about it :P
I finished the braces and mounted the top yesterday. I am rather pleased with the result. Just by singing in it, it responds to various notes and
ranges which is a great sign in my experience.
I went to 1.5 mm for the top. I think that will contribute to the sound in a good way and I made the bracing in a comparable fashion to the nahat
bracing discovered with the first brace after the bridge on an angle.
I decided I will be using a full length fingerboard on this oud again so I wont need the inlay up top.
I will be using a stunning peice of cocobolo for the fingerboard and also the pickguard.
Samir.
@samiroud Instagram
samiroudmaker@gmail.com
|
|
|
bulerias1981
Oud Junkie
    
Posts: 771
Registered: 4-26-2009
Location: Beacon, NY
Member Is Offline
Mood: John Vergara Luthier Lord of the Strings instrument making and repair
|
|
Great work as always. I'm glad to see you're back at the bench again. A big congrats on your new born daughter. May she have many good healthy
years.
Oud is looking good. 1.5mm is a bit thin I think on the soundboard, but you can compensate with the bracings. I'm curious to see how this turns out.
Good luck ya Samir!
|
|
|
paulO
Oud Junkie
    
Posts: 534
Registered: 9-8-2004
Location: California
Member Is Offline
Mood: Utz
|
|
It looks really great ! The grain's amazing, (you've heard this one before) - I look forward to a sound sample  - and thanks so much for sharing the details of the project..and of
course, good health for your newborn daughter. - and thanks so much for sharing the details of the project..and of
course, good health for your newborn daughter.
Regards..Paul
|
|
|
| Pages:
1
2 |